6.1 KiB
| title | keywords | description | linkTitle | weight |
|---|---|---|---|---|
| Overview | Kubernetes, KubeSphere, Linux, Installation | Overview of Installing KubeSphere on Linux | Overview | 2110 |
For the installation on Linux, KubeSphere can be installed both in clouds and in on-premises environments, such as AWS EC2, Azure VM and bare metal. Users can install KubeSphere on Linux hosts as they provision fresh Kubernetes clusters. The installation process is easy and friendly. Meanwhile, KubeSphere offers not only the online installer, or KubeKey, but also an air-gapped installation solution for the environment with no Internet access.
As an open-source project on GitHub, KubeSphere is home to a community with thousands of users. Many of them are running KubeSphere for their production workloads.
Users are provided with multiple installation options. Please note not all options are mutually exclusive. For instance, you can deploy KubeSphere with minimal packages on multiple nodes in an air-gapped environment.
- All-in-One: Install KubeSphere on a single node. It is only for users to quickly get familiar with KubeSphere.
- Multi-Node: Install KubeSphere on multiple nodes. It is for testing or development.
- Air-gapped Installation on Linux: All images of KubeSphere have been encapsulated into a package. It is convenient for air-gapped installation on Linux machines.
- High Availability Installation: Install high availability KubeSphere on multiple nodes which is used for the production environment.
- Minimal Packages: Only install the minimum required system components of KubeSphere. Here is the minimum resource requirement:
- 2 CPUs
- 4GB RAM
- 40GB Storage
- Full Packages: Install all available system components of KubeSphere such as DevOps, service mesh, and alerting.
If you have existing Kubernetes clusters, see Overview of Installing on Kubernetes.
Before Installation
- As images will be pulled will be downloaded from the Internet, your environment must have Internet access. Otherwise, you need to use the air-gapped installer instead.
- For all-in-one installation, the only one node is both the master and the worker.
- For multi-node installation, you need to specify the node roles in the configuration file before installation.
- Your linux host must have OpenSSH Server installed.
- Please check Port Requirements before installation.
KubeKey
Developed in Go language, KubeKey represents a brand-new installation tool as a replacement for the ansible-based installer used before. KubeKey provides users with flexible installation choices, as they can install KubeSphere and Kubernetes separately or install them at one time, which is convenient and efficient.
Three scenarios to use KubeKey:
- Install Kubernetes only;
- Install Kubernetes and KubeSphere together in one command;
- Install Kubernetes first, and deploy KubeSphere on it using ks-installer.
Quick Installation for Development and Testing
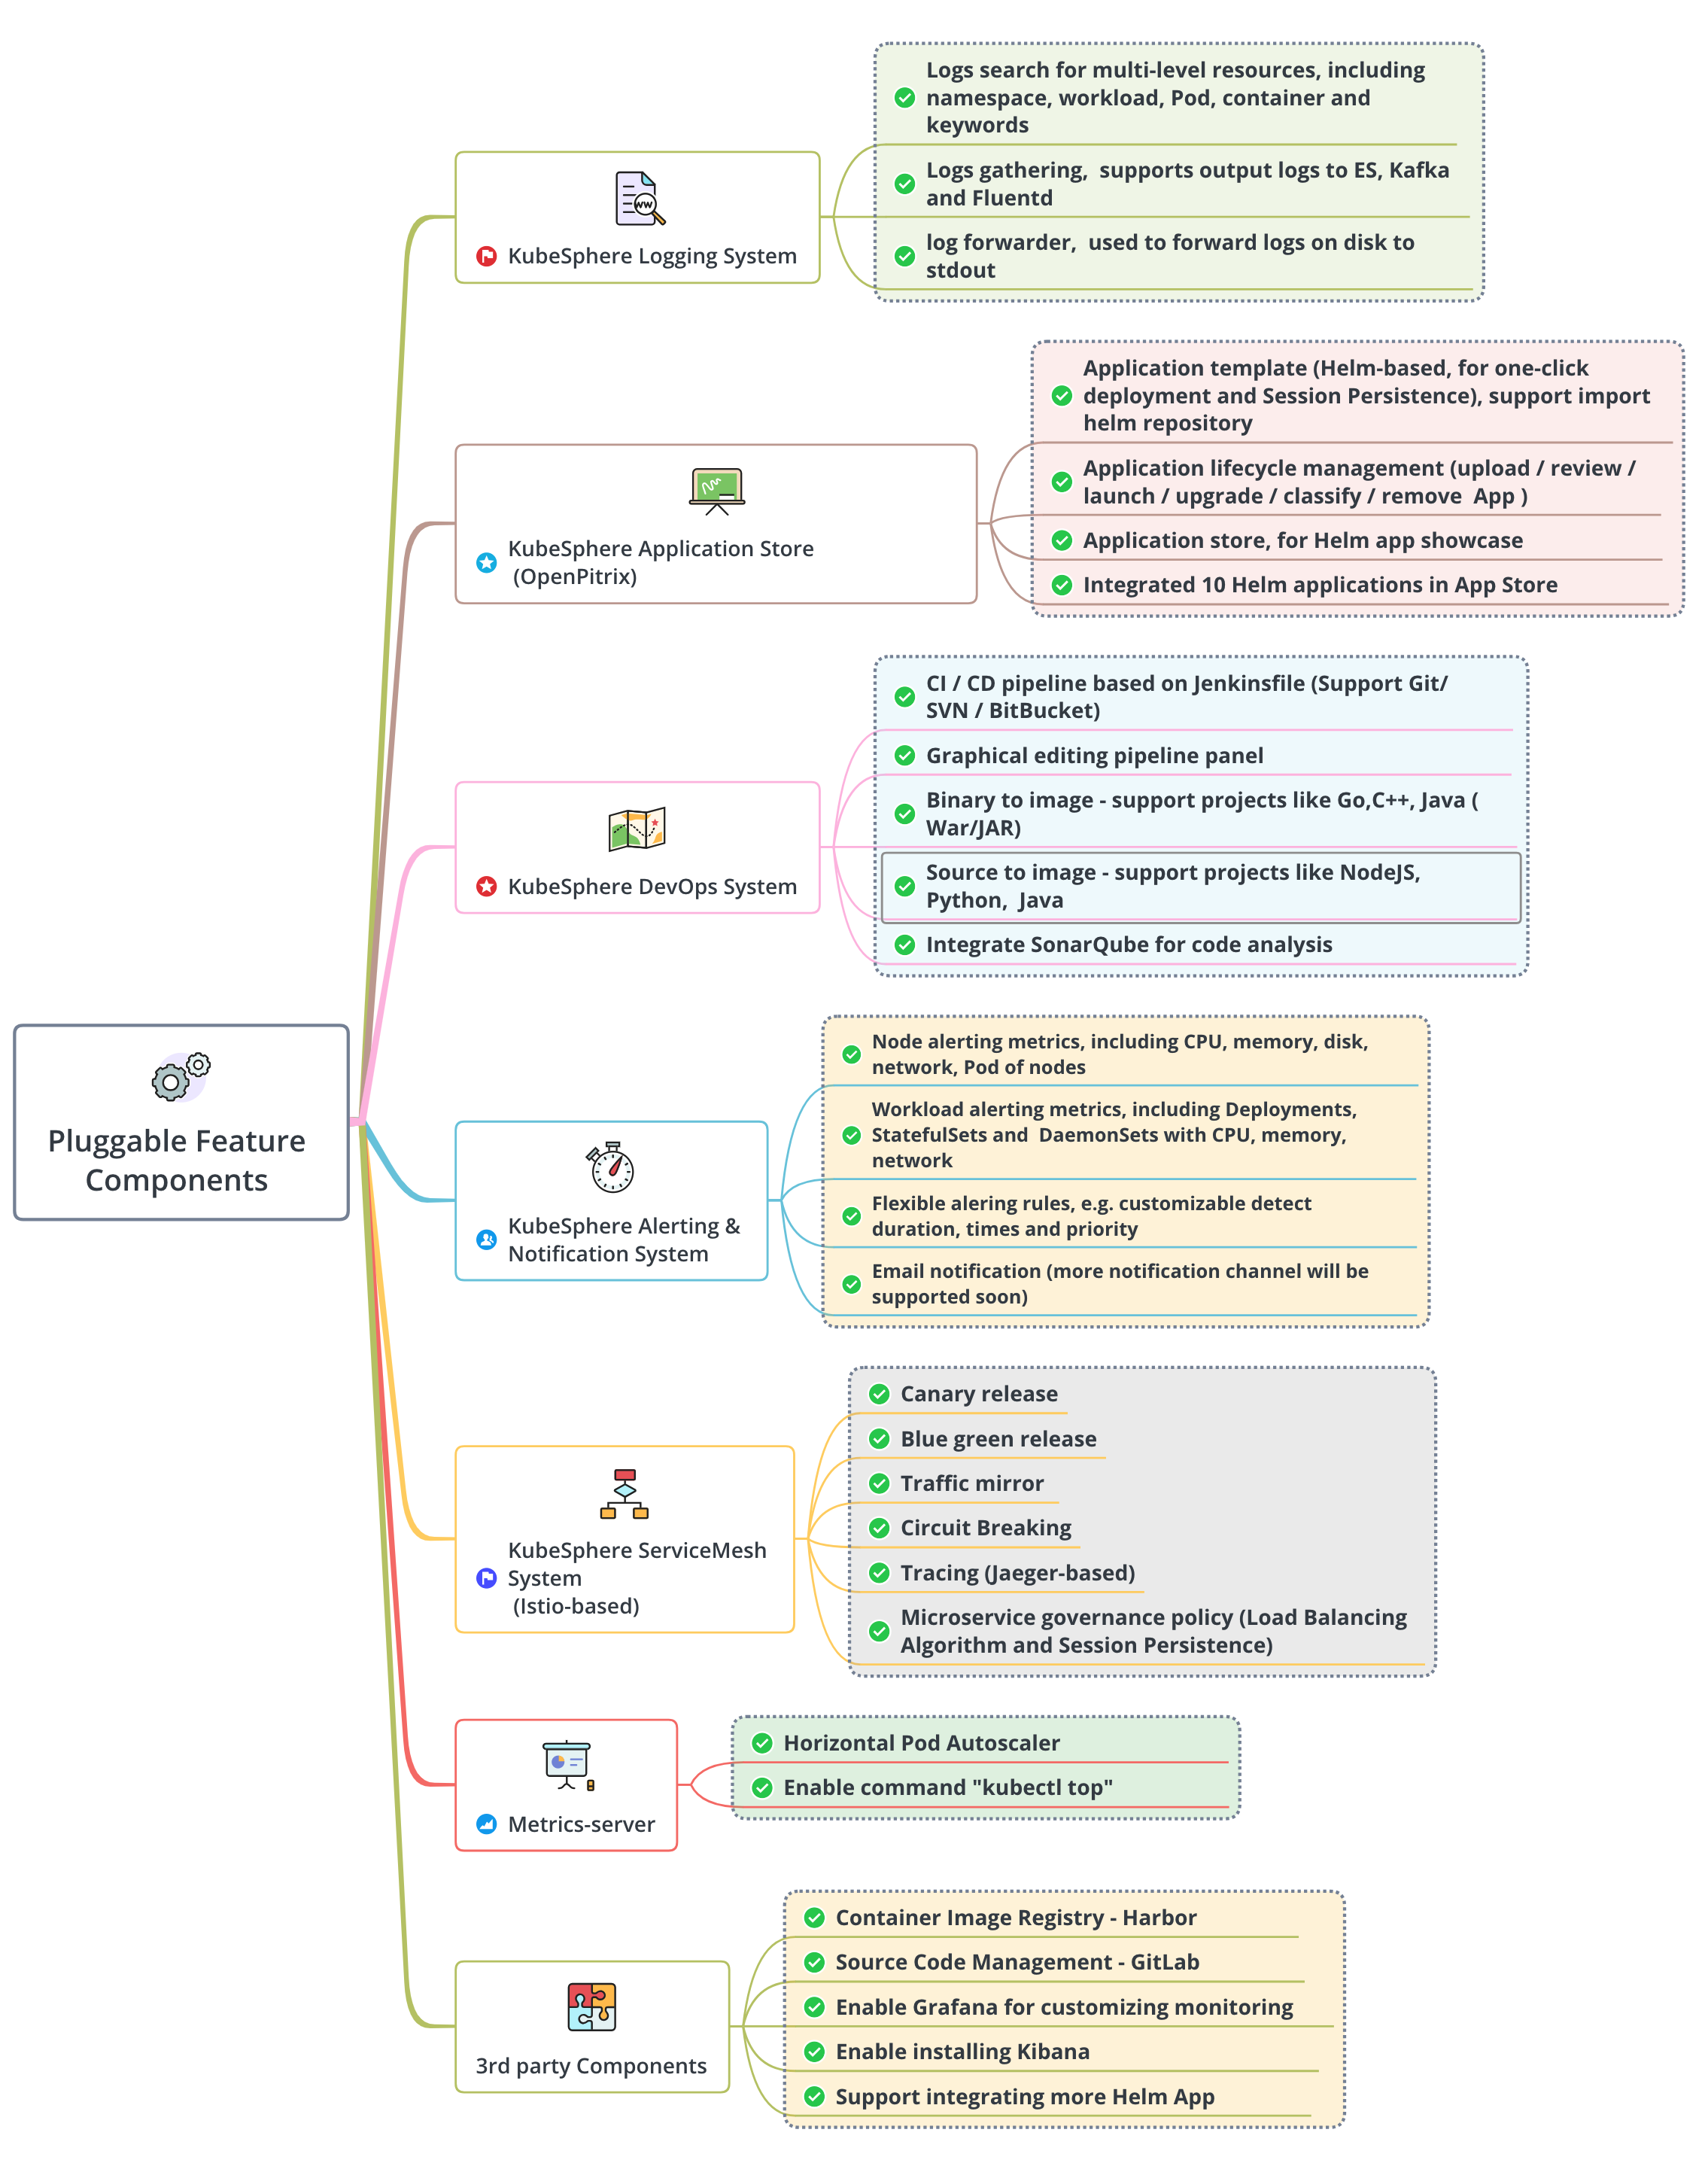
KubeSphere has decoupled some components since v2.1.0. KubeKey only installs necessary components by default as this way features fast installation and minimal resource consumption. If you want to enable enhanced pluggable functionalities, see Enable Pluggable Components for details.
The quick installation of KubeSphere is only for development or testing since it uses Local Volume based on openEBS to provide storage services with dynamic provisioning in Kubernetes clusters by default. If you want a production installation, see HA Cluster Configuration.
- All-in-one. It means a single-node hassle-free installation with just one command.
- Multi-node. It allows you to install KubeSphere on multiple instances using the default storage class (local volume), which means it is not required to install storage server such as Ceph and GlusterFS.
Overview of Pluggable Components
KubeSphere has decoupled some core feature components since v2.1.0. These components are designed to be pluggable, which means you can enable any of them both before and after the installation. By default, KubeKey does not install these pluggable components. For more information, see Enable Pluggable Components.
Storage Configuration Instruction
KubeSphere allows you to configure persistent storage services both before installation and after installation. Meanwhile, KubeSphere supports a variety of open-source storage solutions (for example, Ceph and GlusterFS) as well as commercial storage products. Please refer to Persistent Storage Configurations for detailed instructions regarding how to configure the storage class before you install KubeSphere.
For more information about how to set different storage classes for your workloads after you install KubeSphere, see Add New Storage Classes.
Cluster Operation and Maintenance
Add New Nodes
With KubeKey, you can scale the number of nodes to meet higher resource needs after the installation, especially in a production environment. For more information, see Add New Nodes.
Remove Nodes
You need to drain a node before you remove it. For more information, see Remove Nodes.
Uninstalling
Uninstalling KubeSphere means it will be removed from the machines, which is irreversible. Please be cautious with the operation.
For more information, see Uninstalling.